This week I’ve been working less on the functionality, and more on a map to play around on. This being said, that’s not to say I didn’t work on functionality at all! I have two major updates for this week’s blog post!
As for map design, I’m focusing on the concept of a creepy school. This idea came by part from Phasmophobia, and by part from a dream I had many years ago, of which I have directly modeled the first hallway based off that dream, though using only the Unreal Starter Content.
Next, I began to work on the non-euclidean geometry, a feature I absolutely love about many games, such as Anti-Chamber, or Layers of Fear! As you walk through one door, you end up in a room you were not expecting! Then, as you try to go back you end up in a DIFFERENT room, making the map more and more confusing for each layer of room swap!
This last week I’ve been playing around with some more ideas, which include learning how to add some basic AI to an NPC to chase after you, how to kill them with bullets, and more!
Firstly, I learned how to make NPC’s that chase after you, and then by accident I made the map slightly spooky through lighting, or lack thereof!
Once I had that figured out, I started playing with the idea of flickering lights, using a random interval within a specified range to make it look a bit more natural as a broken, flickering light would be.
Lastly, I worked on a very important feature, waves! Now, more NPC’s do not spawn until after you have killed all the currently spawned ones. On top of that, each wave they increase in health making it more difficult over time!
I’ve had a crazy past couple months, learning so much both in class and on my own! I’ll add a few examples in for what I’ve been working on, but so far I’ve created TicTacToe, created a number puzzle game from some old Mensa books, and started working on some ideas that involve a personal game idea I’ve had for a while! Also, I’m going to set a reminder on my phone to post weekly at minimum from now on, to keep you all updated on my progress!
Firstly, let’s discuss TicTacToe. These are some long gifs, so I had to lower their framerate, but as you can see I have created a fully scalable TicTacToe board, which can go up to 47×47 on my current screen size, with an added bonus of allowing for more than 2 players! I set it to be a max of board size, meaning you can have up to 7 players on a 7×7 board, and so on, which the method of checking for a win being scalable with the player count as well.
Secondly, we have a game called Spokes, or WagonWheel to some. My dad found it in a Mensa book a long while back and has been begging me to make it for him since High School. I was finally able to create it, with some added bonuses including a line size slide bar to make the lines slightly larger, a Number Hints button which shows the total needed active lines, current active lines, and the difference between the two, plus the color hints button that shows when a specific circle has too man, not enough, or the correct amount of active lines next to it! Needless to say my dad was very excited! On top of all that, you can download it to play the game for yourself at:
Finally, we land on what I can only label as a surprise. This game is an idea I have had for a decent while, but for now I am starting off small by learning to create specific functions required for the much larger project this game will become. Currently I have learned one method of detecting when the player is near an instance of the NPC. This then shows the text above their head, which disappears when you move away. With that, I was able to have a speak mechanic to move to their next piece of text, thus “speaking” to the player. For a bonus, I learned how to make this in a way that each NPC can have completely unique text, while using the same base code and not having to start from scratch for every NPC I need to build within this game!
Overall, I’ve been extremely busy learning and building these past few months, and with everything I’ve created I’m only in Programming 1 so far, relearning the basics of programming. Needless to say, I’m excited to come back to these extracurricular projects in upcoming classes as I learn better, more efficient ways to build some of the functions I’ve built in these projects!
Hey everyone! You may be wondering where I’ve been, and I have some amazing news for you! After having that fun re-learning Unity Basics and after about a day of looking at Unreal Engine I was extremely excited about my new journey and got carried away diving head-first into my classes! I am going to try my hardest to post more often than I have in the last month and a half, but I can’t promise a daily post the way I did when I started this blog. Though I’m still in the Gen Ed portion of my studies, I am already playing with Unreal Engine 5 in my free time and learning a lot!
One thing I’ve learned is the basic movements in a third person game, but also how to teleport between different layers of a side scrolling level. On top of that, I made sure to stop the character from teleporting against or into walls to keep the character on the correct platform!
On top of that, I also learned how to make the basics to a card game, even allowing for the cards to be moved around in the hand for your own organizing purposes. Getting the moved card’s opacity back to fully opaque after being moved proved to be harder than expected, but I figured it out!
Learning Unreal Engine so far is completely different from learning Unity. In Unity, I focused on learning C#, and learning how to create items through code. So far in Unreal Engine I’ve mostly focused on learning the engine, itself, and how to create and manipulate assets and objects within the engine, instead of focusing on C++. That being said, it has been very cool to learn so far, and I’m sure I’m going to enjoy learning it further!
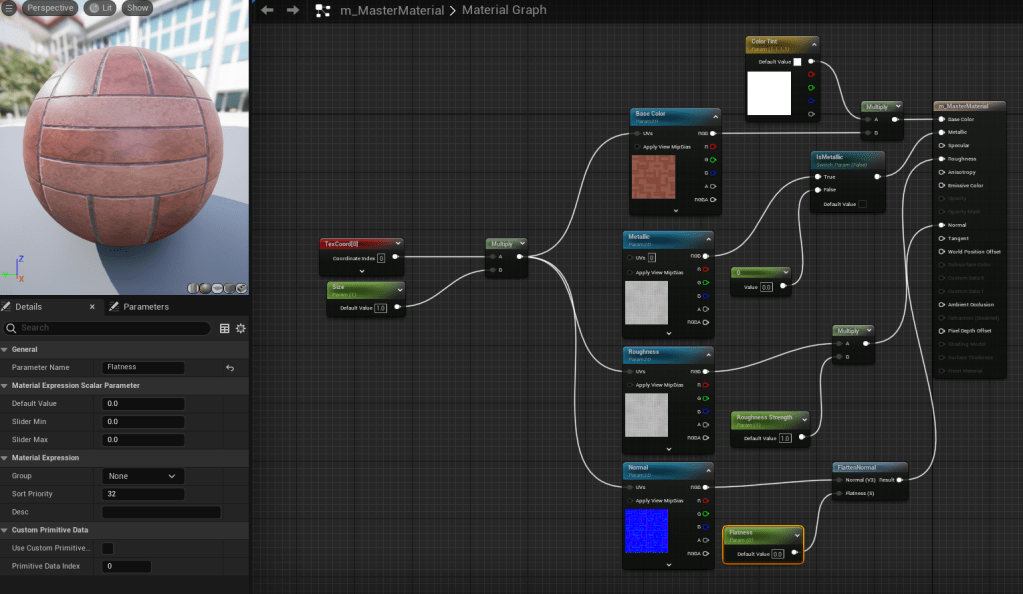
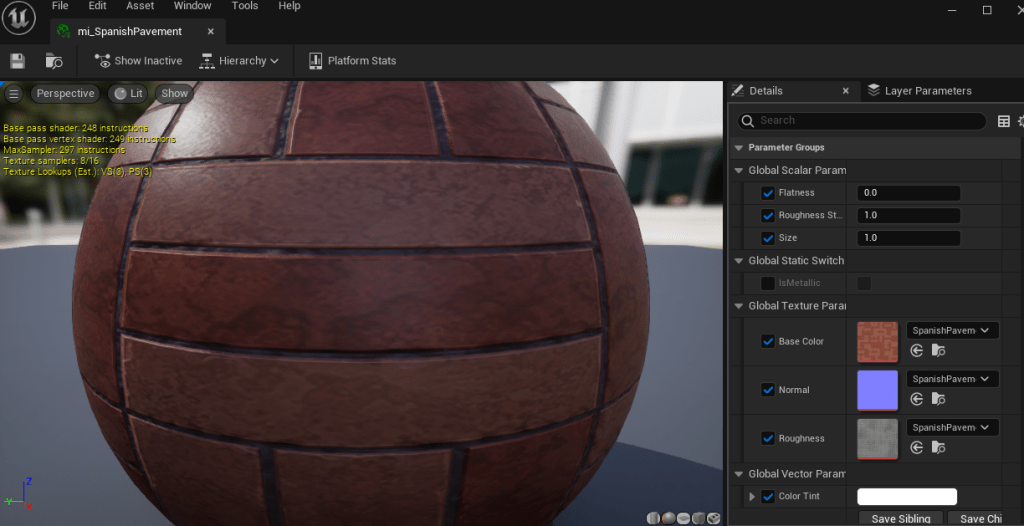
Something this tutorial focuses heavily on is materials. Specifically, how to make simple customizable materials with the standard, included, assets Unreal has to offer, with the help of some assets created by the presenter. We first started by creating the base color, metallic values, roughness, and what is called the “normal” in the material settings. Once it was at a good point, we changed many of those same pieces into parameters, allowing it to be edited live in an instanced version of the material.
As you can see in the image above, this is the instanced version of the original material. Anything on the right with a checkbox allows us to change those variables in real time to see in the scene. We could even change the base texture from pavement to grass, or water, if we needed to. Overall Unreal Engine feels like a completely different beast, but I have yet to focus on the actual code and have only been focused on the engine itself.
You may have noticed my lack of posting over the last few days, and there is a reason for that! I was making a lot of progress in learning on my own, but I have decided to take some classes, and work on getting a degree in the field. That being said, this school focuses on Unreal, not Unity, meaning I am going to shift my focus from learning Unity to learning Unreal, instead. I will continue to post here on my new blog as I go through this transition and begin to create in Unreal! Make sure to come back tomorrow to see what I have learned during Day One of Learning Unreal!
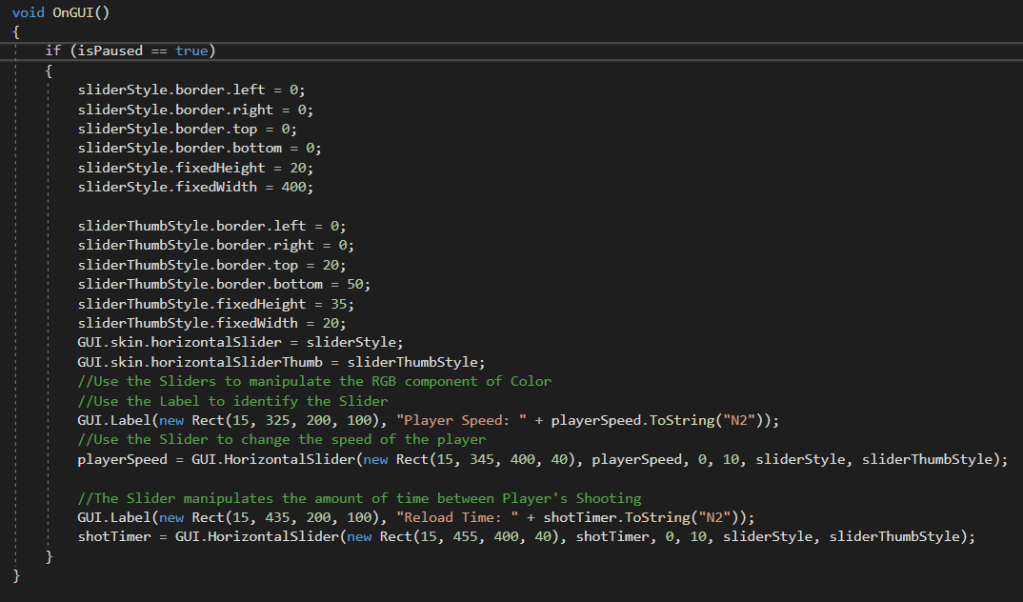
I give up, I’m done, this piece has gotten the best of me! That is what I could be saying, but instead I dug deeper and found the answer! I have been struggling with Horizontal Sliders last night and this morning, as they look horrible and are completely unusable. However, once you find the correct settings you can make them look like this, or even better!
It was incredibly difficult finding the correct usage, even after finding the available documentation, but once I cracked that, I found it to be extremely intuitive and easy to use. Again, the biggest hurdle was simply finding the correct usage withing the extremely lacking amount of documentation available. I still have a lot of work finding out what every number does, and how I can manipulate this to my liking, but the important part is I got the basics working, allowing me to deep dive into more of the slider settings.
Today had some big wins, and that’s not just because I’m playing a video game. I managed to swap my entire Enemy system to a single object, where the color shows their remaining health. Not just that, but I added a player object, moved the lasers from the mouse to the new player object, and added a timer to prevent spamming your attack!
On top of all of these major updates, I added a pause function to the game, with a quit button, allowing you to close the game, whether you ran out of time or are rage quitting.
After discussing with a friend, my next plan is to add settings to the pause menu, such as player speed, bullet speed, and possibly more!
I have been working hard to fix and improve the game I have been creating, and I now have an extremely basic version of Space Invaders! I spent my time learning how to have one enemy become a damaged enemy when it gets hit, and how to remove the laser during the same collision. Originally, I couldn’t get the collision trigger to work, until I learned there was a difference between the 2D and 3D collision triggers, and then everything immediately worked. Then, it was all a matter of putting the pieces together.
Next piece I’m planning on working on is replacing these with health-based enemies. Instead of creating a new object to replace the first, the sprite will be determined by the amount of health left. I believe that would clean up my code quite a bit, and allow me to create new, different enemies with a lot less code. That being said, I am happy to have learned it the way I did, as it definitely has it’s uses. This is simply not the right use-case for that.
I took a break from learning today. Now, before you get confused as to why I’m still writing this blog post, just know I still learned something, it simply wasn’t Unity specific. I went to LinkedIn to update some information and found a Game Design series LinkedIn has for people to learn about what it means to Design a Game, and how to do it. You can watch this video series too, by going here! Though I didn’t learn how to program, or how to build a game, I did learn an important skill, and that is how to make a game. Near the beginning she claimed that the viewer would, by the end of the video, design their own game. I chuckled and kept watching. She claimed all you needed was a pen, paper, two coins, and a die. I said, “You know what, I have all of those easily, why not?” She told the viewer to draw a squiggly line down a paper, and as soon as I drew it, I knew. She just had me create the layout of a board game, and the coins are the two players.
She went on from there to discuss theory and best practice when designing games. For starters, a game requires a core. The basis of what the entire game is designed to be, designed to do. A core can range from RPG, or Puzzle, to Sailing Simulator, or First Person Shooter. Once you have that decision made, then comes the next, Features. Say it’s a Sailing Simulator, five features could include these: Unique Boats, Steering, Land Masses to avoid, Waves to challenge you, and Wind to teach you how to use it in your favor. From there you might say, “Fishing would be an amazing feature to add!” However, fishing is not required in a Sailing Simulator. With that added, any additional feature that is not required, should be added when there is extra time, not before. I learned more about the different types of Designers: Lead Game Designer, Level Designer, Content Designer, System Designer, Economic Designer, and Creative Director. Though, I’ll let her explain them all for you, all you have to do is watch her video series on it!