I was casually watching a CaptainSparklez Subreddit video, where he reviews the top 19 reddit posts, this month, from the CaptainSparklez Subreddit, where he came across this post.
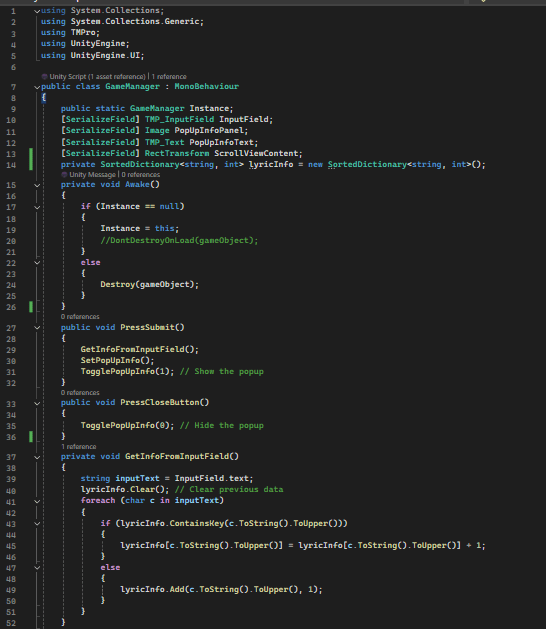
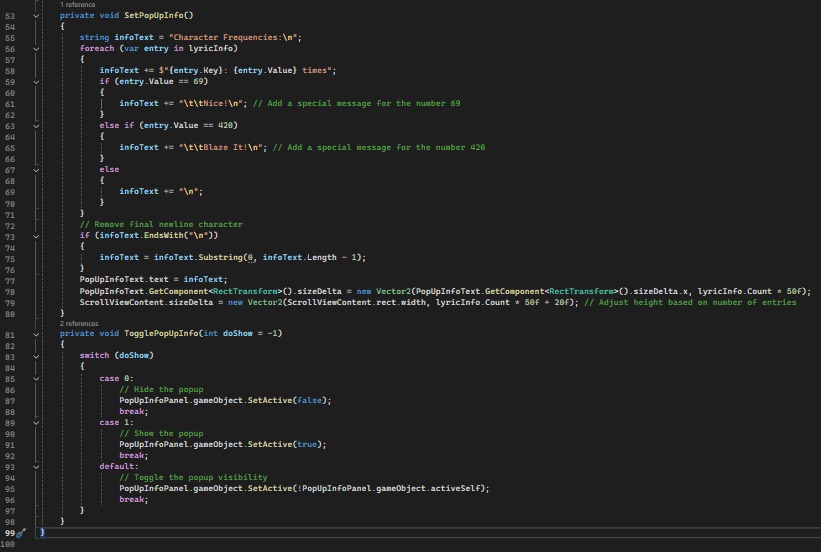
Immediately, my mind went to, “I could easily create something in Unity real fast that tells me how many there are to confirm this.” Thus, I did exactly that!
I can confirm that there are NOT 69 L’s in the TryHardNinja/CaptainSparklez song, Revenge. I did test Fallen Kingdom, however, where there are 69 S’s. The fun part is that I did all this in under 100 lines of code, with a few comments thrown in! That wasn’t necessarily a challenge I was trying, but a neat detail nonetheless!
As for the video, be sure to give it some love with an extra view! Also, no, he is not dead, but there is a great reason it has that as the title!
This is a longer post, as I am writing on multiple topics, please enjoy.
Over the past 20 months I have spent most of my attention focused on being a full-time student at Full Sail University, working toward a Bachelor of Science in Game Development. I am proud to say I am only 5 weeks from graduation at this point, and I am excited as can be! Full Sail is an incredibly difficult school to keep up with, due to their quick deadlines and difficult homework requiring a strong work ethic to keep yourself motivated to succeed! With only a month per class, many months being two classes, most classes have multiple full assignments per week that you have to work on as you attempt to absorb all the information quickly. On top of all that, they have a 90% attendance policy! With each class only being 8-12 days, many classes you can only miss 1 excused day, being that excused allows you to miss slightly more, without failing. 1 unexcused absence in many classes means failing for attendance.
I am excited to be ending with a 3.94 GPA and perfect attendance!
I still have this month and next month’s class to change that GPA, but the only change would be up, as I should be getting 100% in both of these months, due to the nature of these classes. These final months are dedicated to what they call “Open Portfolio,” which is when the student works on their Capstone Project. This gives the student two full months to work on whatever they are wanting to create, whether that be solo or in a team.
My idea was already created for my Capstone Project, but first I felt the need to finally release the game I had been working on in private, Spokes! You can see it in My Portfolio Page, where I officially released it on ItchIO and Google Play. I plan on releasing on Apple and Steam as well, when I have the time. Now to discuss my Capstone Project plans.
For my Capstone Project, I decided to work on something that is a mix between a game and a tool. I have a board game, named Zombicide, that is a large box with many tiles of many sizes. If I want to plan ahead, I have to pull the tiles out, set up a map, take a picture, and prepare any balancing that may be needed for the friends I am playing with. However, this requires a lot of time for setup and cleanup, for when I want to plan ahead. Due to this, I set out in my own free time to create a tool that allows me to take the tiles I own, and place them on the screen, thus eliminating the need to open the box up, setup, and cleanup. I very quickly realized I would need assets, and went on a search for official Zombicide assets. In this search I learned they released official zip folder, and found it was due to someone else who created a similar tool! Great, this means I don’t have to make mine! However, I immediately found flaws with their version and decided I still wanted to create a better version. This is where we get to Open Portfolio, and my Capstone Project. I figured when better to work on this, than two months where my full time job is to create something I am passionate about? Once I began creating, I came up with the idea of adding a way for users to create their own packs, officially, through my tool, which is the feature I’m working on as I type this post! Not only will the user be able to import packs to design a layout for the game they want to play, but for users who create their own board games, this tool will give them a way to simply create a zip folder fully ready for other users to download and import on their own!
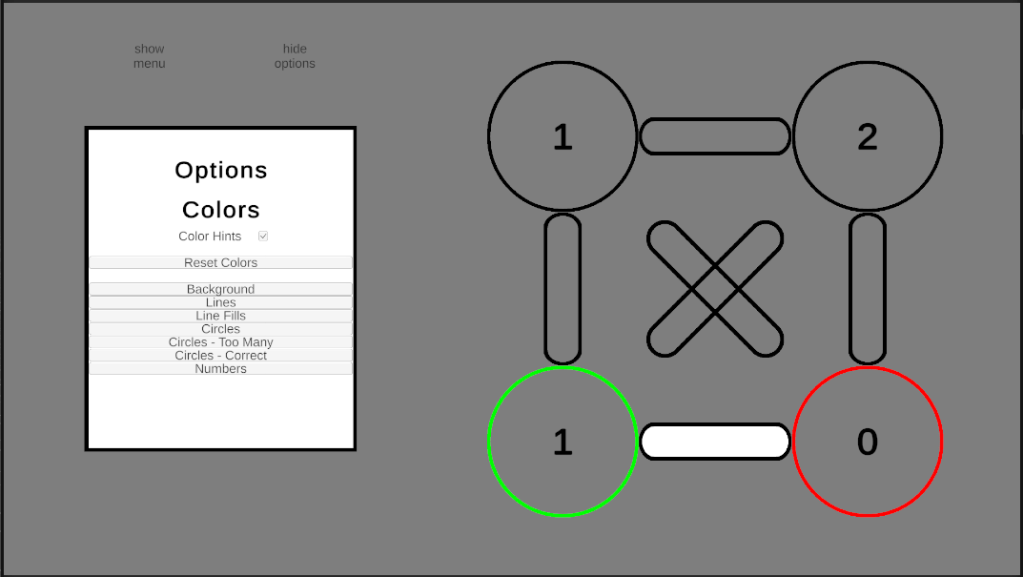
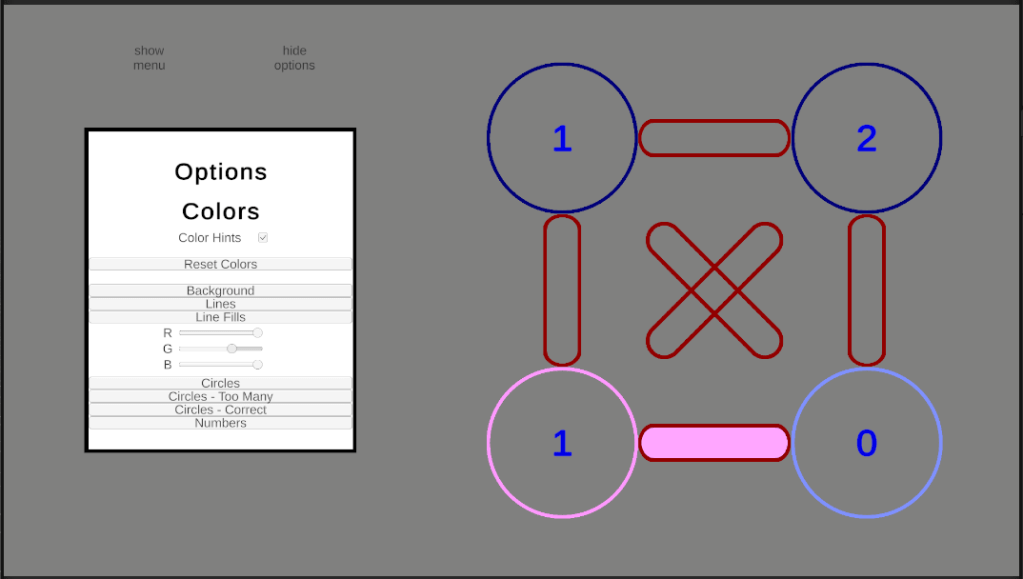
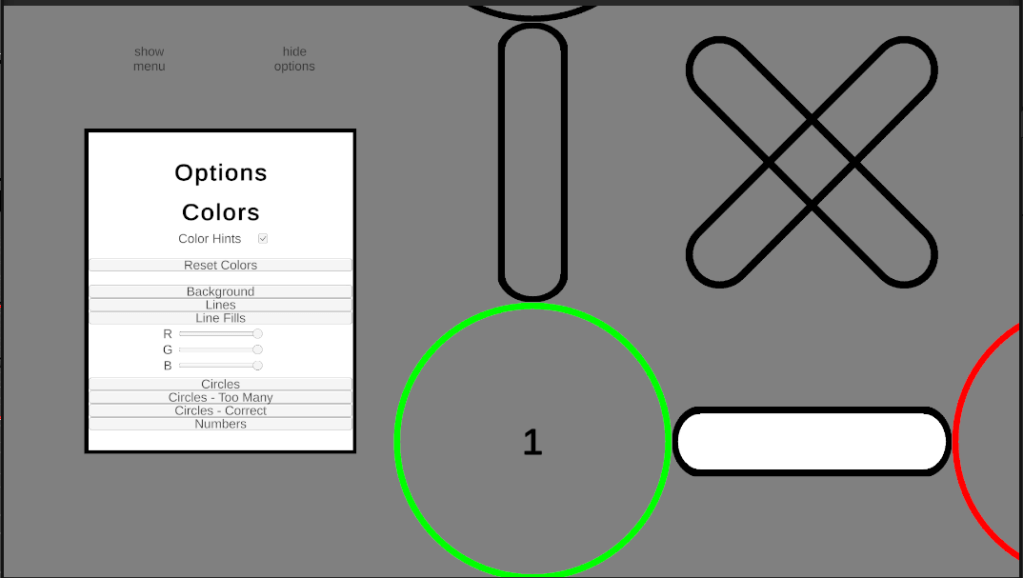
This week I’ve been hard at work on accessibility features. Specifically, in this case, I’m referring to color options. When creating Spokes, I added an option to show when a circle has the correct number of active lines or too many active lines based on the coloring, but my teacher reminded me of an important detail. I was using Green as Correct and Red as Too Many, as green is commonly “good” and red is commonly “bad.” The detail I was reminded of was the commonality of red-green colorblindness, meaning some people would struggle to see the difference between these two. Thus, I began working on an options menu where the player can change the colors. While I was at it, I figured I would simply add options for all other colors, as well, giving the user the ability to change any color excluding the menu itself.
As well, I added the ability for the board to zoom in and out. I implemented two versions of zooming for this. One where the player scrolls, for PC, and one for when the player pinches or spreads, for mobile.
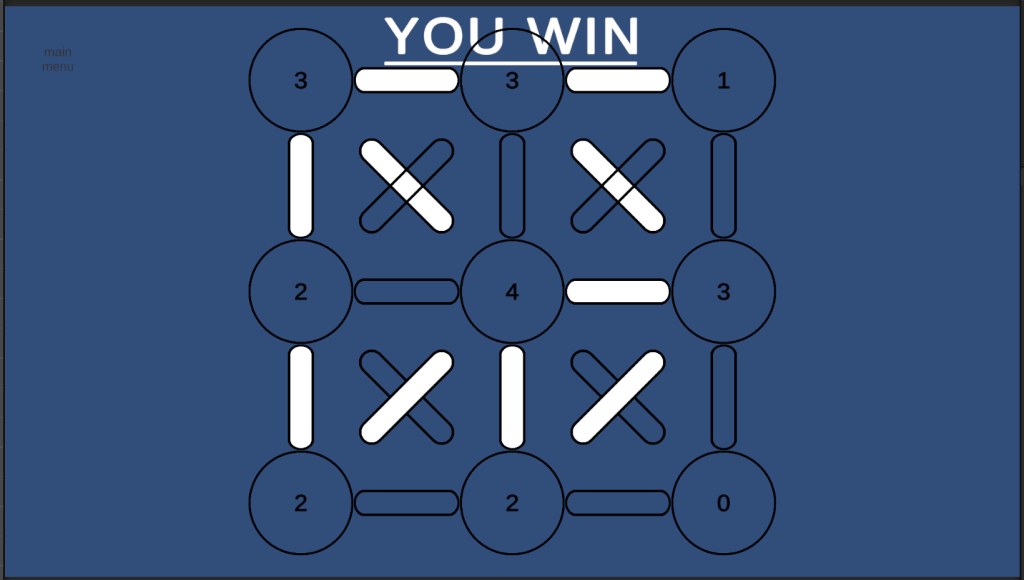
My next planned task was to work on the win event, for when a player completes a puzzle. However, given the new color options menu becomes increasingly small depending on the screen, I am planning on editing the current zoom function. My plan is to make it so when the player pinches and spreads, or scrolls the mouse-wheel, the entire game zooms in and out, not only the puzzle. This way the player can zoom into the menu as well as the puzzle, making the smaller buttons in the options menu much easier to use.
I’ve been hard at work, but in my free time I’ve been hard at work recreating Spokes in Unity, as mentioned in my last post! I am nearly at the point where this version will actually surpass the Unreal version!
The logic has been created, and was much easier in this version thanks to the concept of the GameManager, to check for win scenarios. With this, my next step it to add extra options, such as a color system to tell the player hoe close to winning they are, and to decide what I want “you win” message to be changed to. Overall, I’m happy to have tried remaking this in Unity, as I’ve been enjoying it more than when I created it in Unreal.
Despite the reference to an amazing title, this post is not about Red Vs Blue. This post is actually about the game I made in Unreal Engine a while back, Spokes. I thought I would give a shot at recreating the same game in Unity, given everything I have learned over the past couple months. I have not completed it yet, due to a busy schedule involving not only Full Sail Hall of Fame, but also meeting important people I hope to work with in the future.
I’ve spent roughly 8 hours working on this, split into portions of free time, and I have the basic setup created. As well, I added the ability for the board to move out of the way of the menu, and for the menu to move out of the way of the board, respectively. This allows the game to be centered when the player is focused on it. I am currently working on the functionality of the board setting itself up as a possible puzzle, then I plan on fixing the currently temporary placement of the board pieces, as they are offset slightly from where I want them to be. As well, I need to work on the dynamic resizing of pieces as the player chooses larger boards, allowing them to fit more easily.
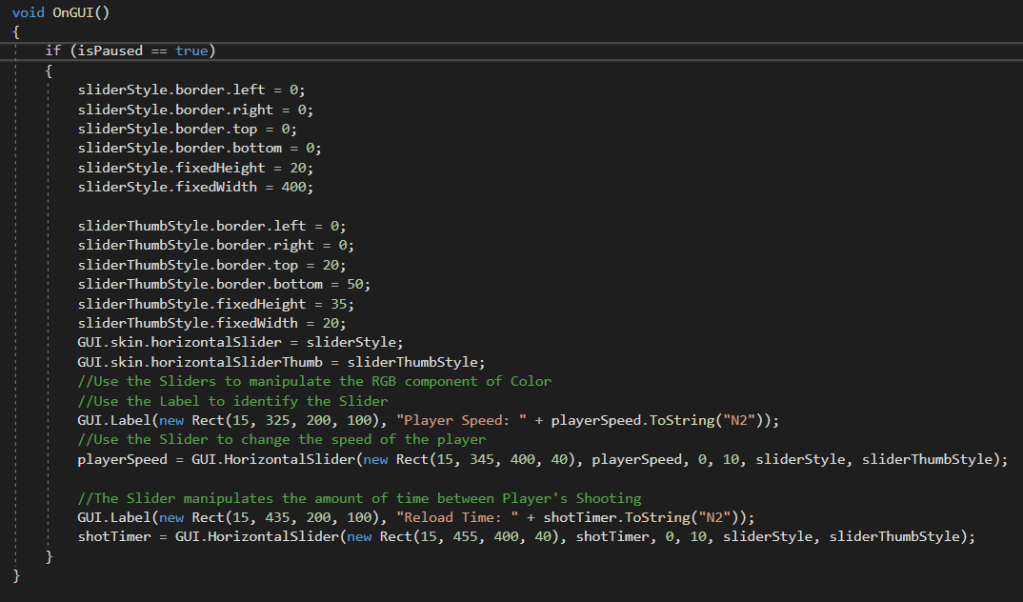
I give up, I’m done, this piece has gotten the best of me! That is what I could be saying, but instead I dug deeper and found the answer! I have been struggling with Horizontal Sliders last night and this morning, as they look horrible and are completely unusable. However, once you find the correct settings you can make them look like this, or even better!
It was incredibly difficult finding the correct usage, even after finding the available documentation, but once I cracked that, I found it to be extremely intuitive and easy to use. Again, the biggest hurdle was simply finding the correct usage withing the extremely lacking amount of documentation available. I still have a lot of work finding out what every number does, and how I can manipulate this to my liking, but the important part is I got the basics working, allowing me to deep dive into more of the slider settings.
Today had some big wins, and that’s not just because I’m playing a video game. I managed to swap my entire Enemy system to a single object, where the color shows their remaining health. Not just that, but I added a player object, moved the lasers from the mouse to the new player object, and added a timer to prevent spamming your attack!
On top of all of these major updates, I added a pause function to the game, with a quit button, allowing you to close the game, whether you ran out of time or are rage quitting.
After discussing with a friend, my next plan is to add settings to the pause menu, such as player speed, bullet speed, and possibly more!
I have been working hard to fix and improve the game I have been creating, and I now have an extremely basic version of Space Invaders! I spent my time learning how to have one enemy become a damaged enemy when it gets hit, and how to remove the laser during the same collision. Originally, I couldn’t get the collision trigger to work, until I learned there was a difference between the 2D and 3D collision triggers, and then everything immediately worked. Then, it was all a matter of putting the pieces together.
Next piece I’m planning on working on is replacing these with health-based enemies. Instead of creating a new object to replace the first, the sprite will be determined by the amount of health left. I believe that would clean up my code quite a bit, and allow me to create new, different enemies with a lot less code. That being said, I am happy to have learned it the way I did, as it definitely has it’s uses. This is simply not the right use-case for that.
I took a break from learning today. Now, before you get confused as to why I’m still writing this blog post, just know I still learned something, it simply wasn’t Unity specific. I went to LinkedIn to update some information and found a Game Design series LinkedIn has for people to learn about what it means to Design a Game, and how to do it. You can watch this video series too, by going here! Though I didn’t learn how to program, or how to build a game, I did learn an important skill, and that is how to make a game. Near the beginning she claimed that the viewer would, by the end of the video, design their own game. I chuckled and kept watching. She claimed all you needed was a pen, paper, two coins, and a die. I said, “You know what, I have all of those easily, why not?” She told the viewer to draw a squiggly line down a paper, and as soon as I drew it, I knew. She just had me create the layout of a board game, and the coins are the two players.
She went on from there to discuss theory and best practice when designing games. For starters, a game requires a core. The basis of what the entire game is designed to be, designed to do. A core can range from RPG, or Puzzle, to Sailing Simulator, or First Person Shooter. Once you have that decision made, then comes the next, Features. Say it’s a Sailing Simulator, five features could include these: Unique Boats, Steering, Land Masses to avoid, Waves to challenge you, and Wind to teach you how to use it in your favor. From there you might say, “Fishing would be an amazing feature to add!” However, fishing is not required in a Sailing Simulator. With that added, any additional feature that is not required, should be added when there is extra time, not before. I learned more about the different types of Designers: Lead Game Designer, Level Designer, Content Designer, System Designer, Economic Designer, and Creative Director. Though, I’ll let her explain them all for you, all you have to do is watch her video series on it!
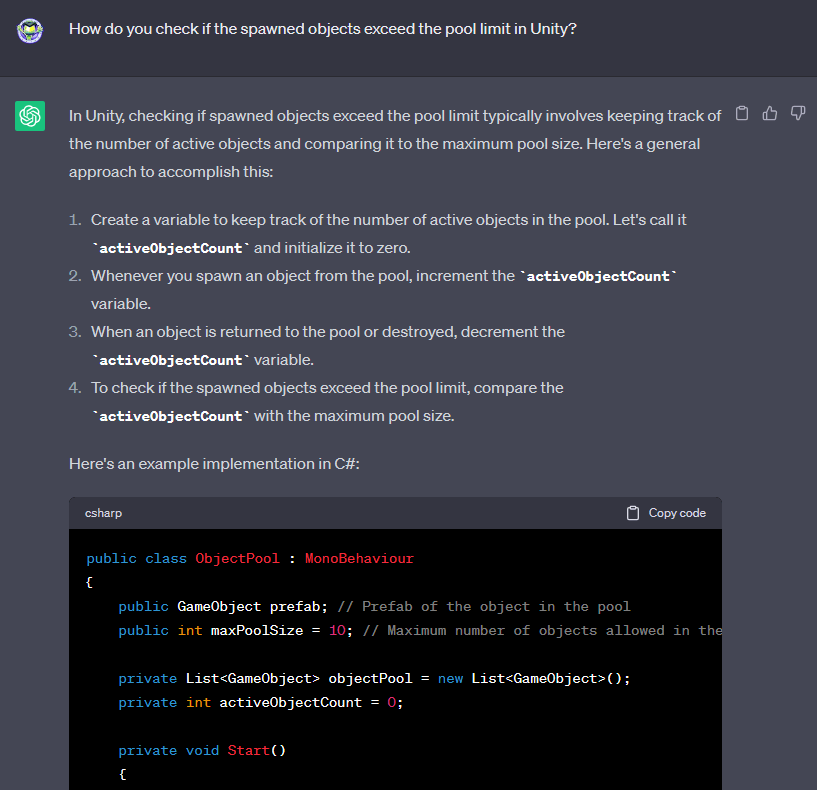
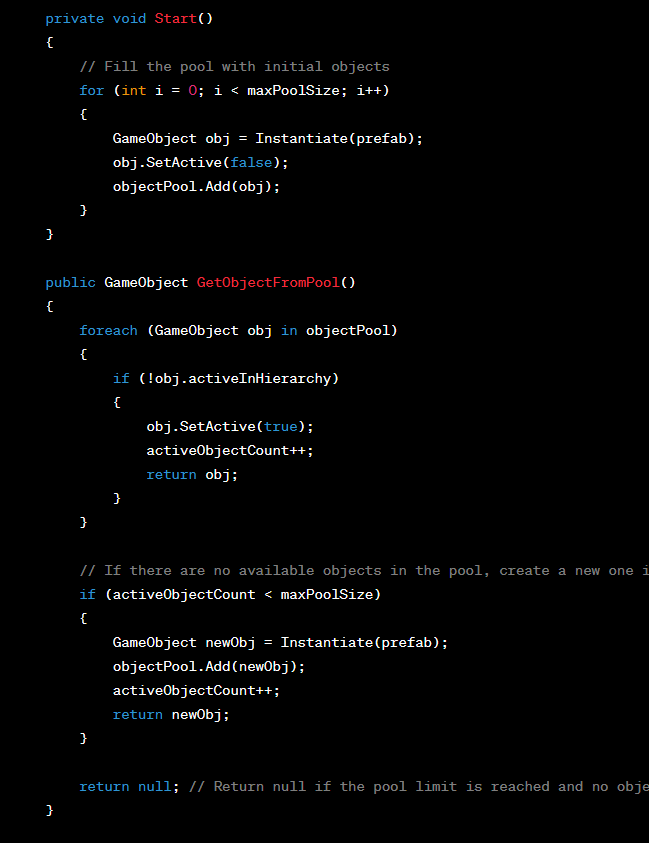
Extra! Extra! Read all about it! Today I asked ChatGPT for help for the first time. ChatGPT was extremely helpful as I asked it how to track whether or not my pool of items was over the limit. Once asked, ChatGPT got to work immediately! Not just did it give me the exact script that I needed, with adjustments to my own script, naturally, but it also gave me a full explanation on how to track it, and what this code does. The way ChatGPT explained this allowed me to easily adapt the template code to my current projects code without having to read through it, trying to make heads or tails, and eventually breaking my project in seven different ways. ChatGPT is not only a great tool for searching, but a great tool for learning, as it actively taught me how to use the script used to answer my question.